Psychedelic Art Soap

It’s been ages since my last post and wanted to get back to posting on my creative endeavors. I’m happiest when I am engaged, focused and creating something. Sadly, I find my time filled with things I HAVE to do rather than what I want to do. This year, I decided to carve out time for my creative projects in addition to my other work. I’m hoping to strive for better work-life balance in my life this year.

While I have been busy with work and school, I have managed to make a few soap batches for a few smaller markets over the past few months. This post is about the last artistic soap I made last year. For this batch, I used 6 different mica colors that I had on hand.

Mixing mica colors

I was initially going to do a striped rainbow soap but then decided to switch the design to a swirl. Did a hanger swirl for the internal design and a free-form swirl on the top. Here is the freshly poured batch after swirling the top.

Freshly poured and swirly soap batch

Here is the freshly cut soap batch. The batch has a fresh fruity scent with notes of grapefruit, lemon, lime and cucumber.

Freshly cut soap batch

Here are the cut bars. I’m happy with how they came out and I’m hoping to do more batches over the few months.

Psychedelic swirly art soap freshly cut.

Autumn Leaves Soap

Ecoviolet Soap Ebru Feathers SoapTime does fly by doesn’t it! I just finished my masters and final exams last month (yay!!!) so now I have some time to experiment with soap art. This month’s challenge was to do a soap design using an Ebru (paper marbling) technique. Here is my color palette after mixing the black, yellow, orange, green and dark pink micas.

Ecoviolet Soap Ebru Soap Mixing Colors

My inspiration was the Blackhawk feathers. My husband has been bugging me for several weeks about making a Blackhawks soap so I thought this was a perfect opportunity to give it a go.

Blackhawks Feathers

Here is the final product after it was just poured. I tried to literally copy the feathers but it looked lame so I just kept adding more soap and freehanded the design for a more abstract feather look. It is scented with Energy orange fragrance. This looks more like autumn leaves than feathers to me but I am happy with the result. It is a bit early for Fall but it is my favorite time of the year!

Ecoviolet Soap Ebru Soap Pic2

Here is the soap a few hours later. I used goat’s milk, mango butter, olive, palm and coconut oils in the soap formulation. The bottom half of the soap is black. I used yellow, orange, green and dark pink micas for the top swirly design.

Ecoviolet Soap Ebru Feathers Soap

Thanks Amy for another fun challenge! I look forward to seeing the other designs. It should be interesting to cut this in a few days. The original Blackhawks feather design is buried somewhere under there. 😀

Spoon Swirl Lavender Geranium Soap

I realize that it has been awhile since my last post. I have been overwhelmed with grad school and farmers market commitments so I missed a few of the soap challenges. This month’s challenge was to do a spoon swirl soap and I just barely squeezed this in my crazy schedule of final exams, winter markets and holiday parties.

It helped that I had enough pre-mixed oils leftover for a small batch of soap (Yay for masterbatching!). I used mango butter, olive, coconut, palm and castor oil for the base formula. The soap batch was scented with lavender and geranium essential oils. I used violet, yellow and light green micas to color the soap.

Here is the soap loaf after it was poured and swirled with a spoon. I also did a few mica swirls on the top of the loaf.

Spoon-Swirl-Loaf

Here is the soap after it was cut 24 hours later. I poured the batch at a thicker viscosity than I was used to based on Amy’s advice. I was concerned about air pockets but this soap design came out really well. I now want to experiment with this technique a bit more for future batches.

Spoon-swirl-trio-soap

Thanks Amy for another fun challenge! It was great to get back into soap design again. I look forward to seeing the other spoon swirl soaps! 🙂


Autumn Color Challenge Soap

Color is one of my favorite things to experiment with and I was excited to see that Amy was doing a color challenge this month. There were two color palettes to choose from and I chose the Mineral Autumn palette below.

Mineral Autumn Color Palette

Mineral Autumn Color Palette (Source: Design Seeds)

I decided to do a side-by-side challenge between 2 sets of colorants: oxide pigments vs. natural colorants (spices/botanicals/clays). For the pigments, I used burgundy oxide, brick oxide, black oxide, and yellow oxide. For the natural colorants, I used paprika mixed with red clay, madder root, activated charcoal, and yellow clay. Below are the colors after mixing. Some colors are similar, others – not so much.

Color-Challenge-colors-used

This soap recipe used coconut, canola, palm and castor oils. In addition to the 8 colorants, I used the uncolored soap for the last neutral color in the palette.

I wanted to see the differences between the 2 color sets so I divided a slab mold in half and did a design with the oxides on one side and another design with the natural colorants on the other side. I mixed and poured the oxide colored soap first so the soap emulsion was very fluid. I then mixed and poured the natural colors on the bottom half of the mold. The second set of soap colors was considerably thicker but still pourable. Below is a picture of the soap after it was just poured. Interesting how light the paprika, madder root and clays look. I was curious to see what the colors would look like after gel phase. I covered and insulated the soap to keep it warm and let it go though gel phase.

Color Challenge Soap Just Poured

Color Challenge Soap Just Poured

Wow – what a difference after 24 hours! The madder root morphed to a dark red color and the yellow clay and paprika/red clay sections look richer in color too. The oxide colored soap looked like the initial pour but had a little ash on top. I notice I tend to get more ash when the soap mixture is poured very thin. I am happy though that the batter was fluid enough to get workable design so that is the trade-off. 😉

Color Challenge Soap After Gel Phase (24 hours)

Color Challenge Soap After Gel Phase (24 hours)

The soap was still very soft today so I will let the batch harden for a few days before cutting the bars.

Thanks Amy for another fun challenge! It was interesting to experiment with various colorants and it took a few trials to match the color palette sample. I may try the other (summer) palette someday. I look forward to seeing the other color challenge soaps! 🙂


Neon Swirl Soap

I just cut this neon swirl soap today and I am so pleased with how it came out!

Neon-Swirl-Soap-Bars

I used the hanger swirl technique which is also this month’s soap challenge technique. I have been off-line lately (busy with school, travel and family issues) and I was looking to get back into experimenting with soap design. I was also excited to play with my new hanger tool from Michelle at the Great Soap Shop on Etsy.

I used a Bastille recipe (80% olive oil and 20% coconut oil) with 4 different neon pigments. The soap was scented with a sweet orange fragrance.

I did another hanger swirl soap before this one but was underwhelmed with the results. This time, I tried a different variation – I pulled the hanger vertically up and down the soap after pouring the 4 colors. I then did a Taiwan swirl on the top. Here is the soap after it was just poured into the mold.

Neon-Swirl-after-pouring-in-mold

Here is the soap after it was cut. I love how each bar has a different design. Some soaps are more yellow and while others are more magenta or blue.

Neon-Swirl-Soap

Thanks Amy for another fun challenge! I look forward to seeing the other hanger swirl designs. 🙂

Neon-Swirl-Soap-Bars


Bamboo Charcoal and Clay Drop Swirl

Just got this drop swirl done in time for this month’s soap challenge!

Bamboo Charcoal & Clay Drop Swirl

Bamboo Charcoal & Clay Drop Swirl

The base was made with coconut oil, olive oil, shea butter and mango butter. I used bamboo charcoal and red and yellow clays for the swirls. The soap was scented with a blend of grapefruit and patchouli essential oils.

The bamboo charcoal was a special gift from the talented Maya of Infusions. I am so excited about how charcoal came out; I didn’t use very much and still had a beautiful design!

This was the first time I have done the drop swirl and I am hooked! The technique is easy but looks great. I am looking forward to seeing all the other drop swirl designs.

I tried a mica oil swirl for the first time on the top of the soap. I used Ruth’s tips for this technique. I love mica swirls too!

Mica Oil Swirls

Mica Oil Swirls

I have also been busy making a lot of plain soap over the past month. I have to do a project for one of my graduate statistics classes this semester, so I was somehow trying to work in soapmaking just to make it fun for me. I was so happy when my project on dreaded orange spots (DOS) was approved by my professor! He really liked the idea and even suggested more factors to study.

I am using Kevin Dunn’s DOS study as a starting point and was also fascinated by the results of Anne-Marie Faiola’s study.

So far, I have made 24 batches of 100% olive oil soap. I am studying how various factors affect the onset of DOS in soap. DOS is typically very frustrating for me but now I carefully inspect each of my Castile soaps, hoping to see an orange spot in some of them. Crazy isn’t it? 😀

100% Olive Oil Soaps

100% Olive Oil Soaps

I will reveal more details in a future blog post. Stay tuned!

Mosaic Soap Art

Embed-Soap-Sun-and-Mountain

Mosaic Soap Art for Soap Challenge

It’s February and time for another soap challenge! Amy’s challenge for this month was to create an embedded soap design. This was challenging for me because a) you have to use freshly made cold process soap in the design (no melt & pour!) and b) I have never worked with embeds in CP soap before. I thought that the challenge was going to be easier than the other challenges but it was actually more work than I thought. I was making dozens of mini soap batches for the last few weeks!

At first, I had no idea what I was going to do for the design. I decided to just start making the embeds and let them tell me what they wanted to be. I mixed up 11 different colors so I would have a wide palette to work with.

Mixing-Colorants

I then made the embed soap base and used practically every small mold I could find. The soap base was made with goat milk, coconut, olive, palm, and castor oils.

Making the embeds

Making the embeds

After using all my small soap molds, I had to be creative about finding more embed molds. Clean milk cartons and food containers make great soap molds! Note: I did not use the easter egg soaps in my final embed designs. The egg-shaped soaps are living in a plastic container to someday become an Easter themed soap.

More embed molds!

More embed molds!

I made the final embedded soaps last Sunday. These were two batches of goat milk soap, both scented with lemongrass essential oil.

The scary thing about making these soaps was that I had no idea how they were going to turn out. I kept looking, sniffing and poking at the soap logs during the week, praying that they were not going to be too hideous for the challenge.

Embed-Log-Soap-Sun-and-Mountain

Confetti-Soap-Log

I just cut the logs today because the soaps were too soft to cut initially. My first embed soap batch is below. It is pretty, but I wish it had a bit more contrast and texture.

Confetti-Soap

I was happier with the second embed soap batch. I was going for an abstract mosaic landscape design.

Embed-Soap-Sun-and-Mountain

You can’t easily see this from the pictures but there are actually three different brown colored pigments used for the mountain embed pieces. I probably should have lightened or darkened the pigments to create more contrast.

I recently started dabbling in watercolor painting and there are many similarities between watercolor painting and soapmaking design. One key thing is that you have to work fast! Another thing is that to really know how the colors are going to turn out, you need to blend colors in advance and do test trials. So this challenge was essentially one big test trial for me to learn how various colored pigments look in soap.

I still have a lot of small embeds left. More embed soap fun is in my future. 🙂 Thanks Amy for another fun challenge. Good luck to everyone doing the challenge! I am looking forward to seeing all the soaps and getting inspired!

Taiwan Swirl Soap

Taiwan Swirl Soap Top

Taiwan Swirl Soap Top

I had so much fun with Amy’s soap challenge last month that I wanted to do this month’s challenge. The soap challenge for January is the Taiwan Swirl. For the Taiwan Swirl design, a base of uncolored soap is first poured into a mold. Stripes of color are then poured along the length of mold. The colored stripes are swirled to produce the design. The soap mixture needs to be very thin so that the colored stripes flow through the base soap. After the soap is cut, all the bars should have some sort of design.

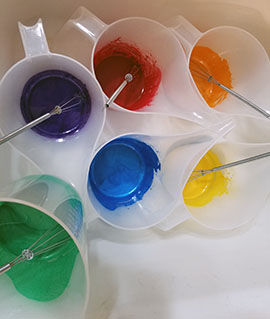
I used the same formula suggested in Amy’s demo – 80% olive oil / 20% coconut oil. I also used the full water amount (26% lye solution). For the fragrance, I used lavender essential oil.

For kicks, I wanted to try three colorant stripes. For the colorants, I used Celini red mica, green chrome oxide and a 2:1 mixture of ultramarine violet and ultramarine blue.

This was a very workable formula for this type of design. I poured at thin trace and still had ample time to swirl the colors.

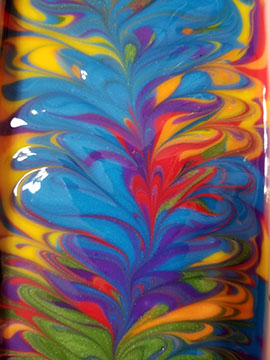
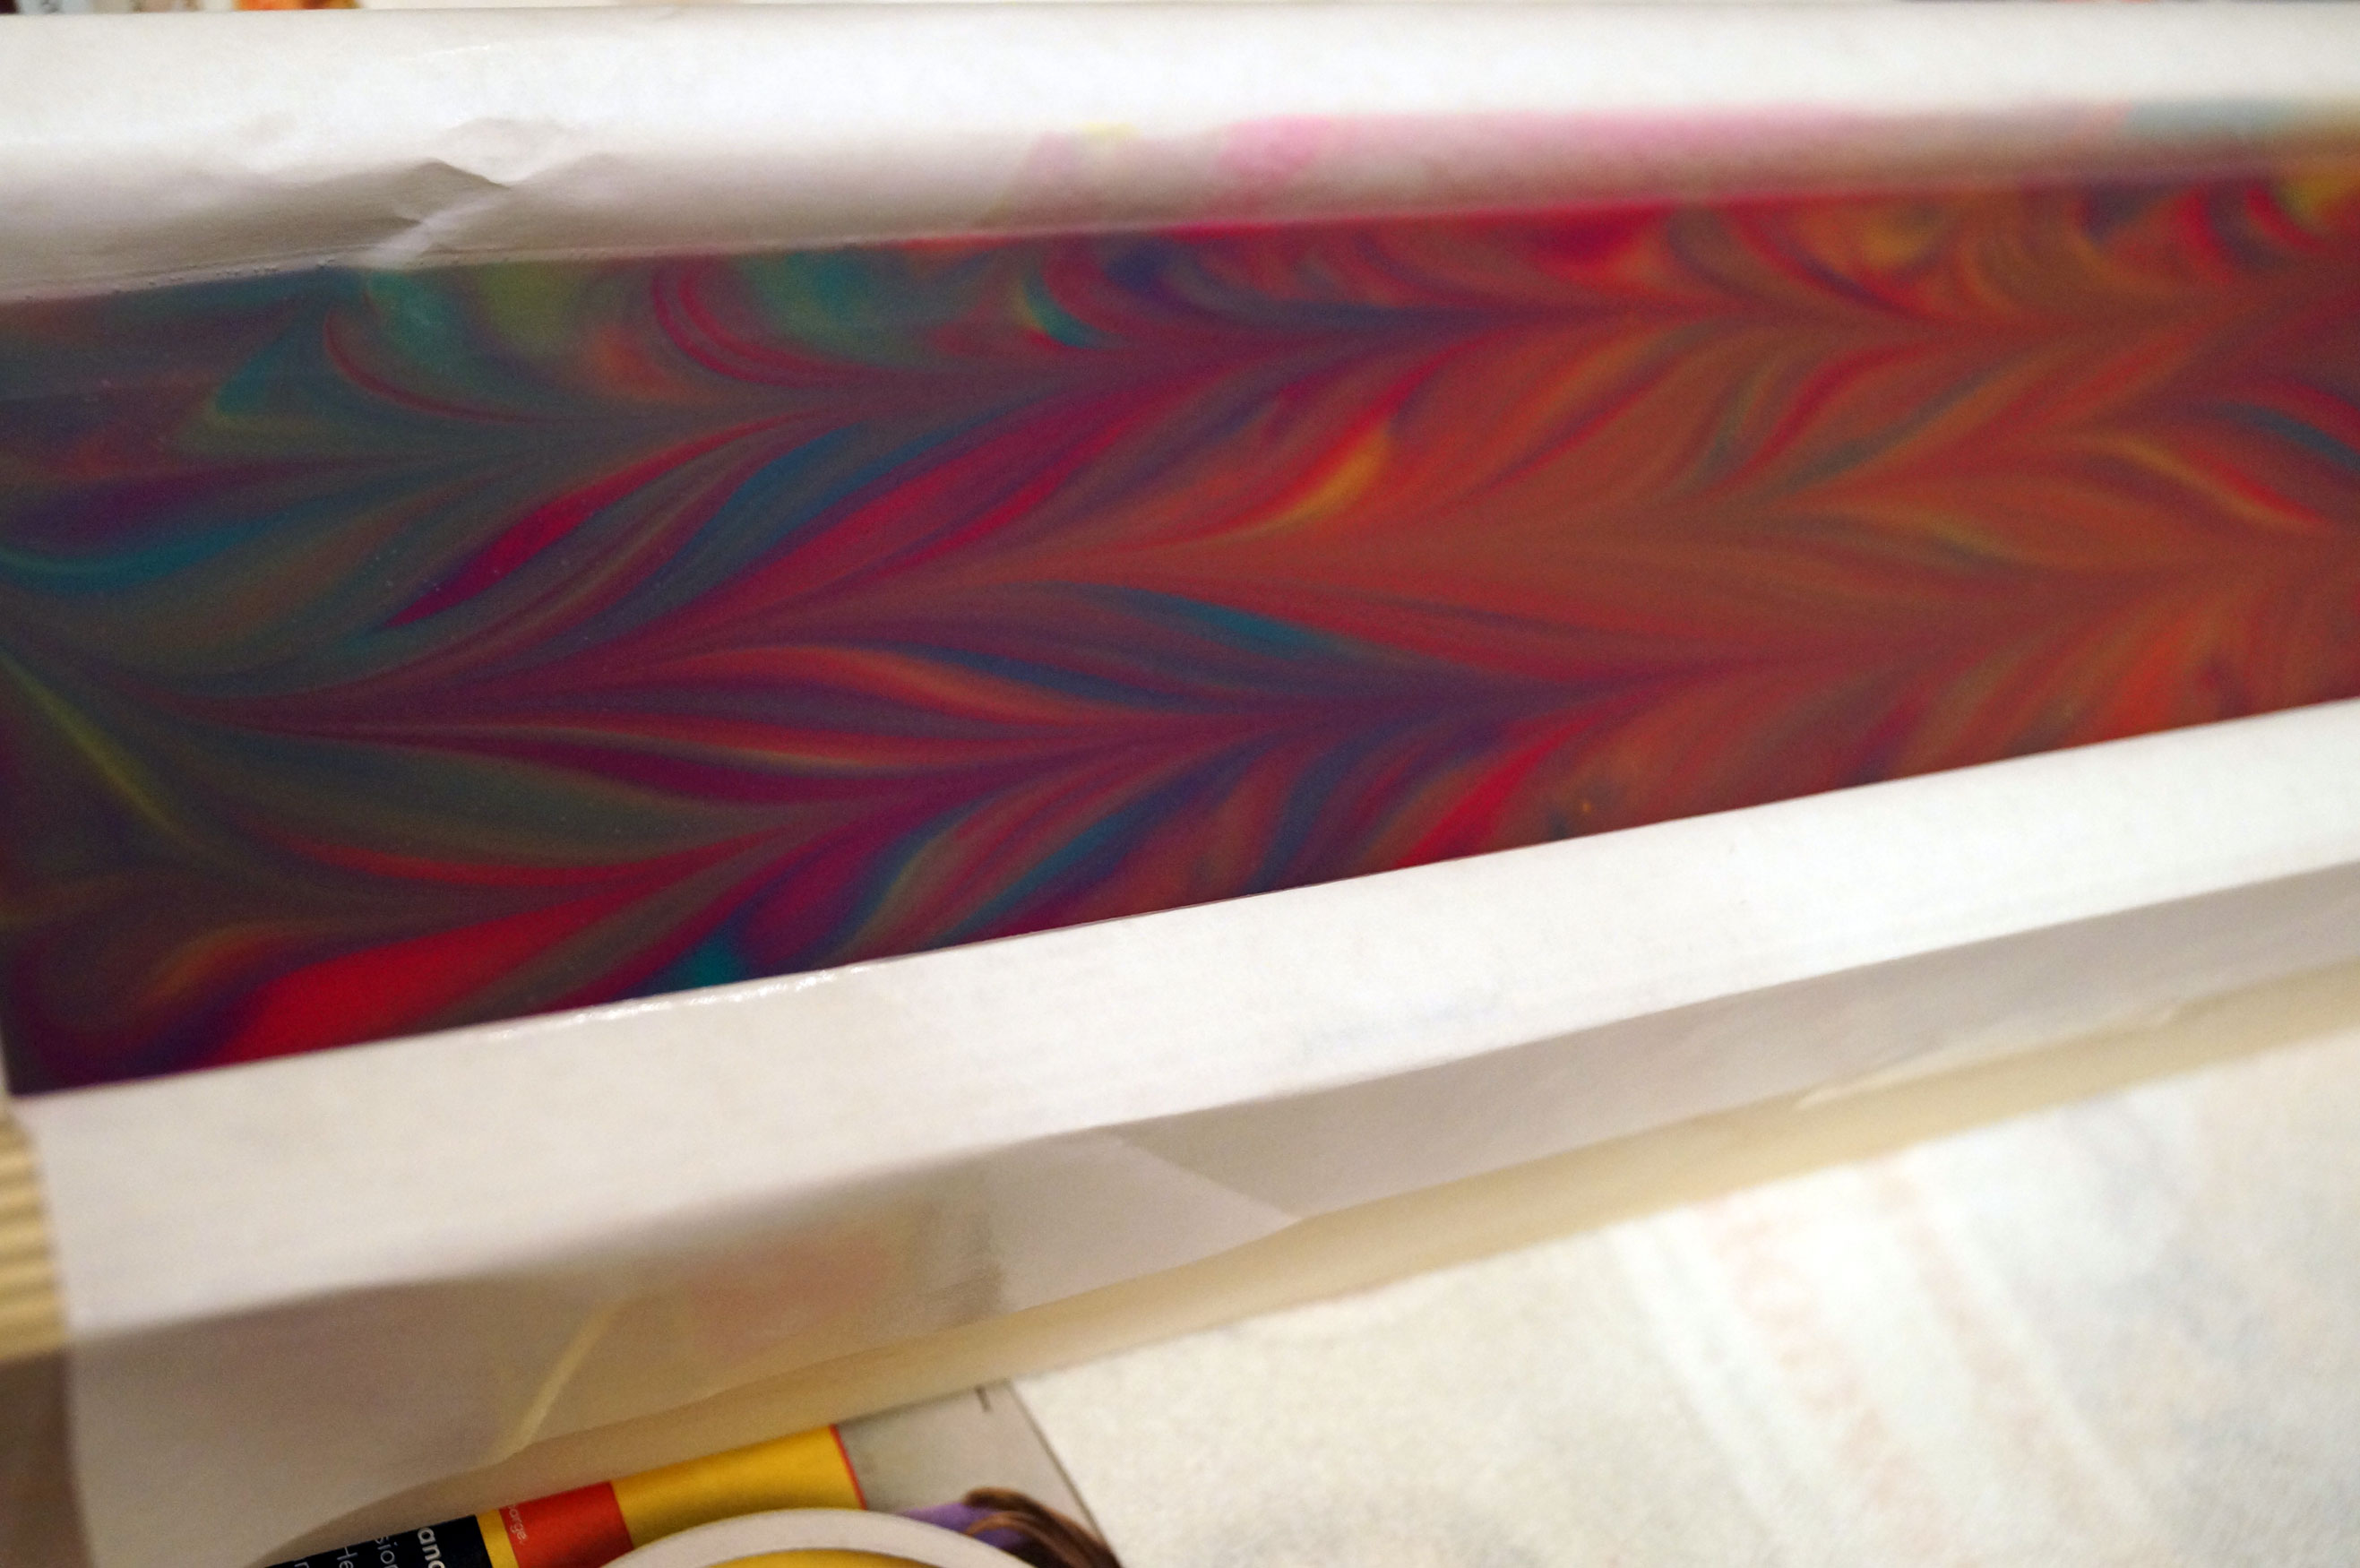
This is what the soap looked like after it was just poured and swirled.

Soap after Pouring and Swirling

Taiwan Swirl soap after pouring and swirling

After 24 hours, I removed the soap from the mold. It was so soft that I couldn’t cut it without damaging the soap. I waited another 24 hours to cut the soap to check to see if the colorants made it into the center (see the pictures below).

Taiwan Soap Cut to Check Center

Taiwan Soap cut to check the center

Curiously, the red mica made it through 3/4 of the soap base but the green and violet colors were not as consistent. For some parts of the soap, the green and the violet made it halfway into the soap base. However, in other parts, the green and violet only made it through 1/3 of the soap base.

Another view of the Taiwan soap cut to check center

Another view of the Taiwan Swirl soap cut to check the center

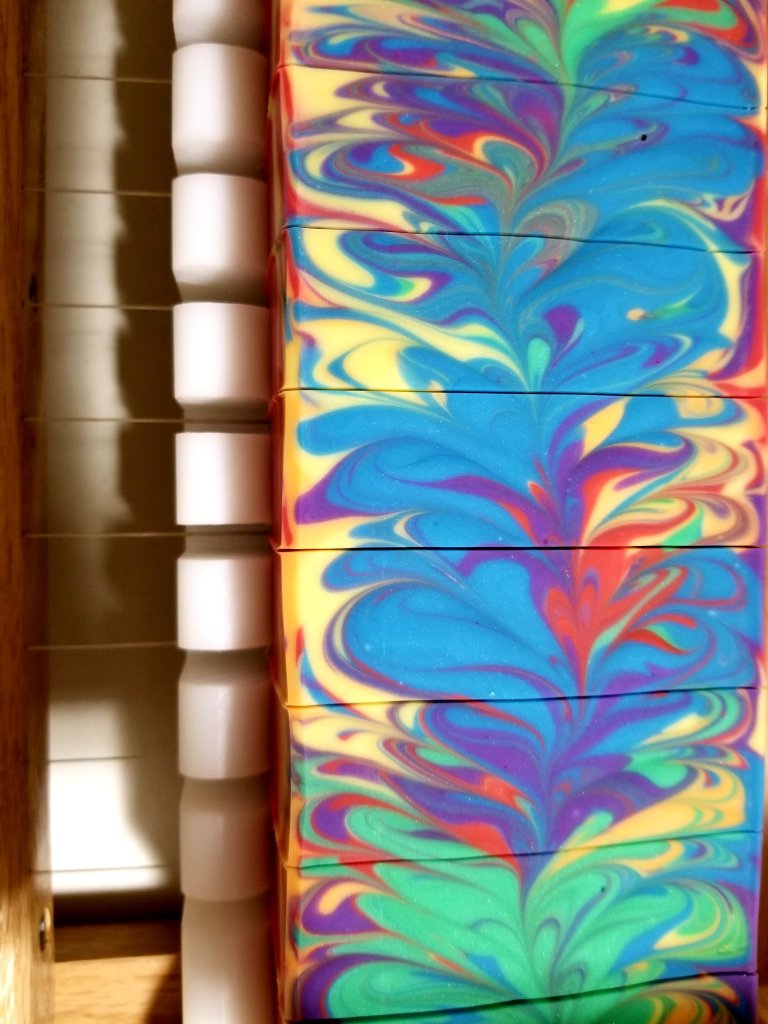
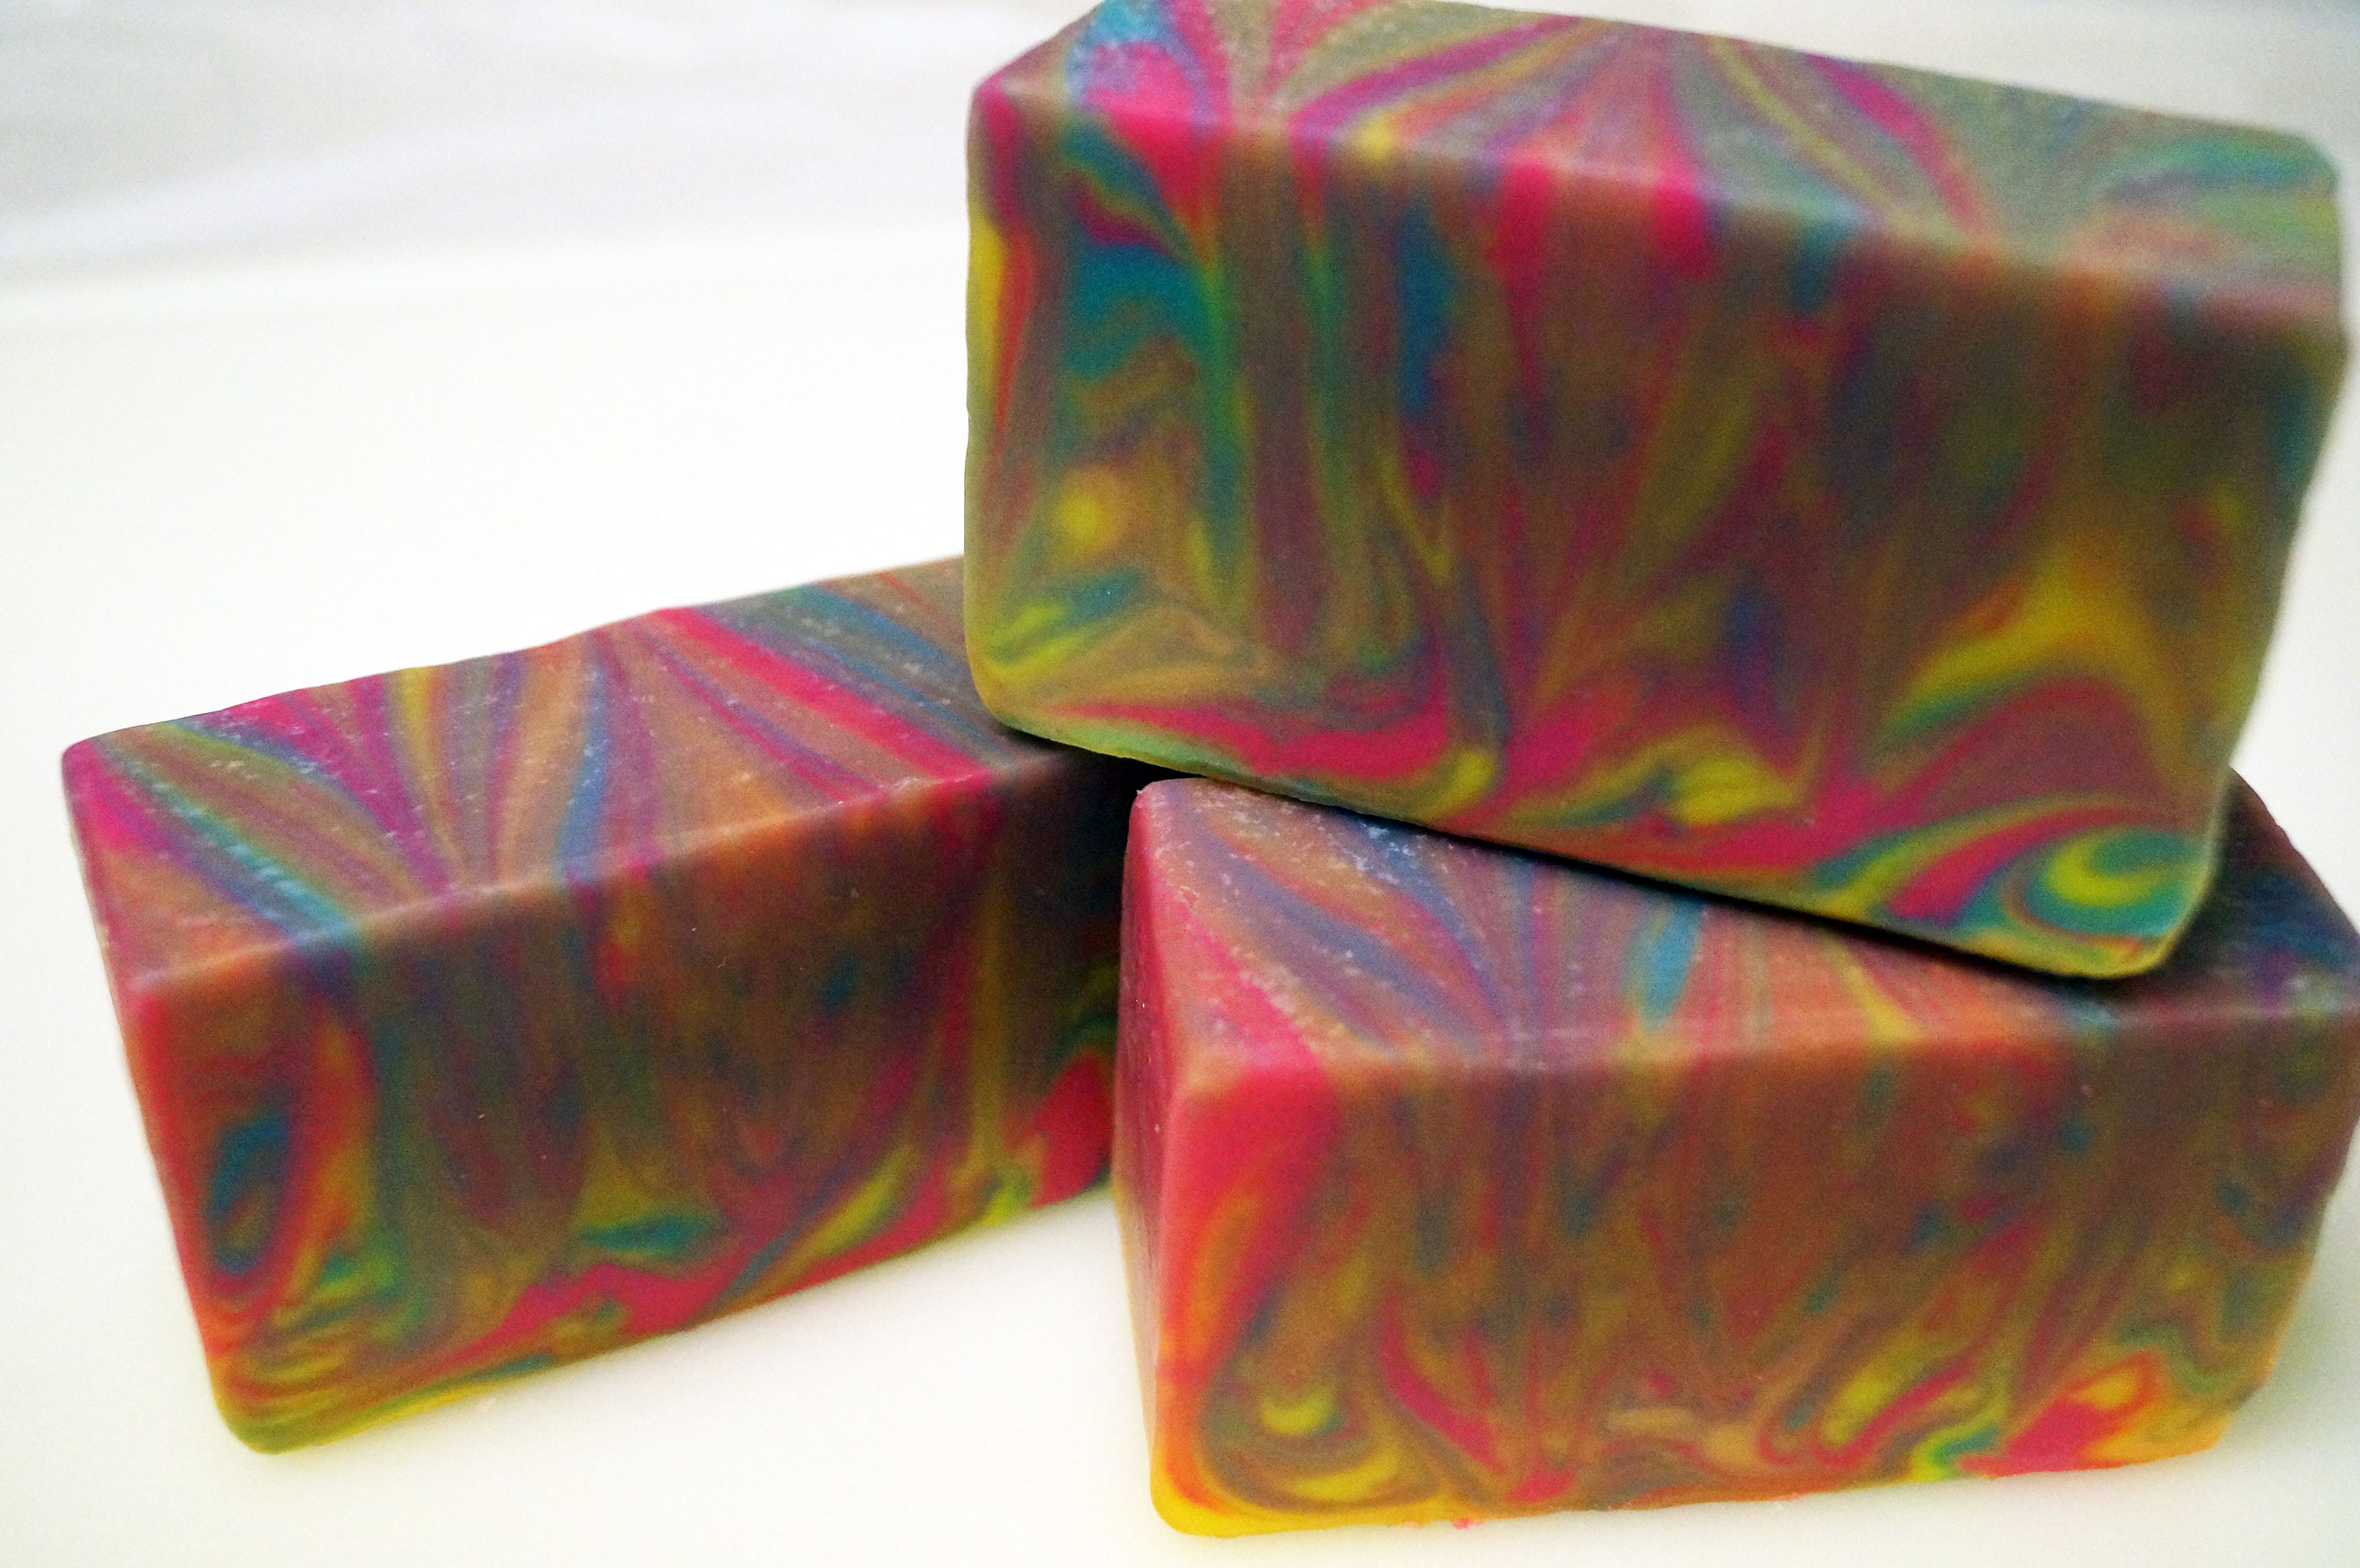
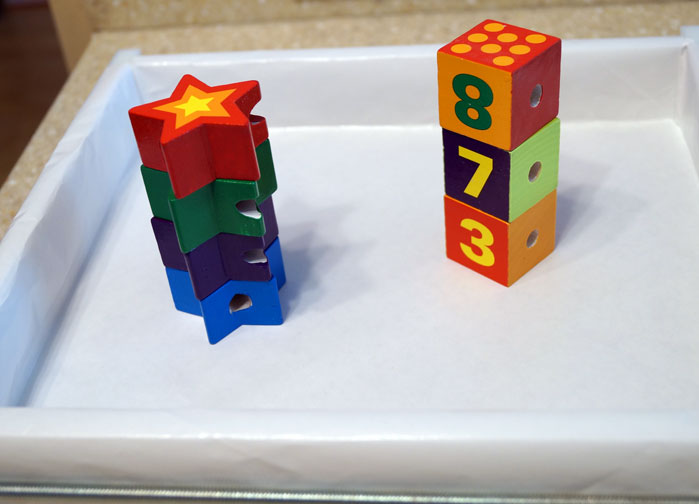
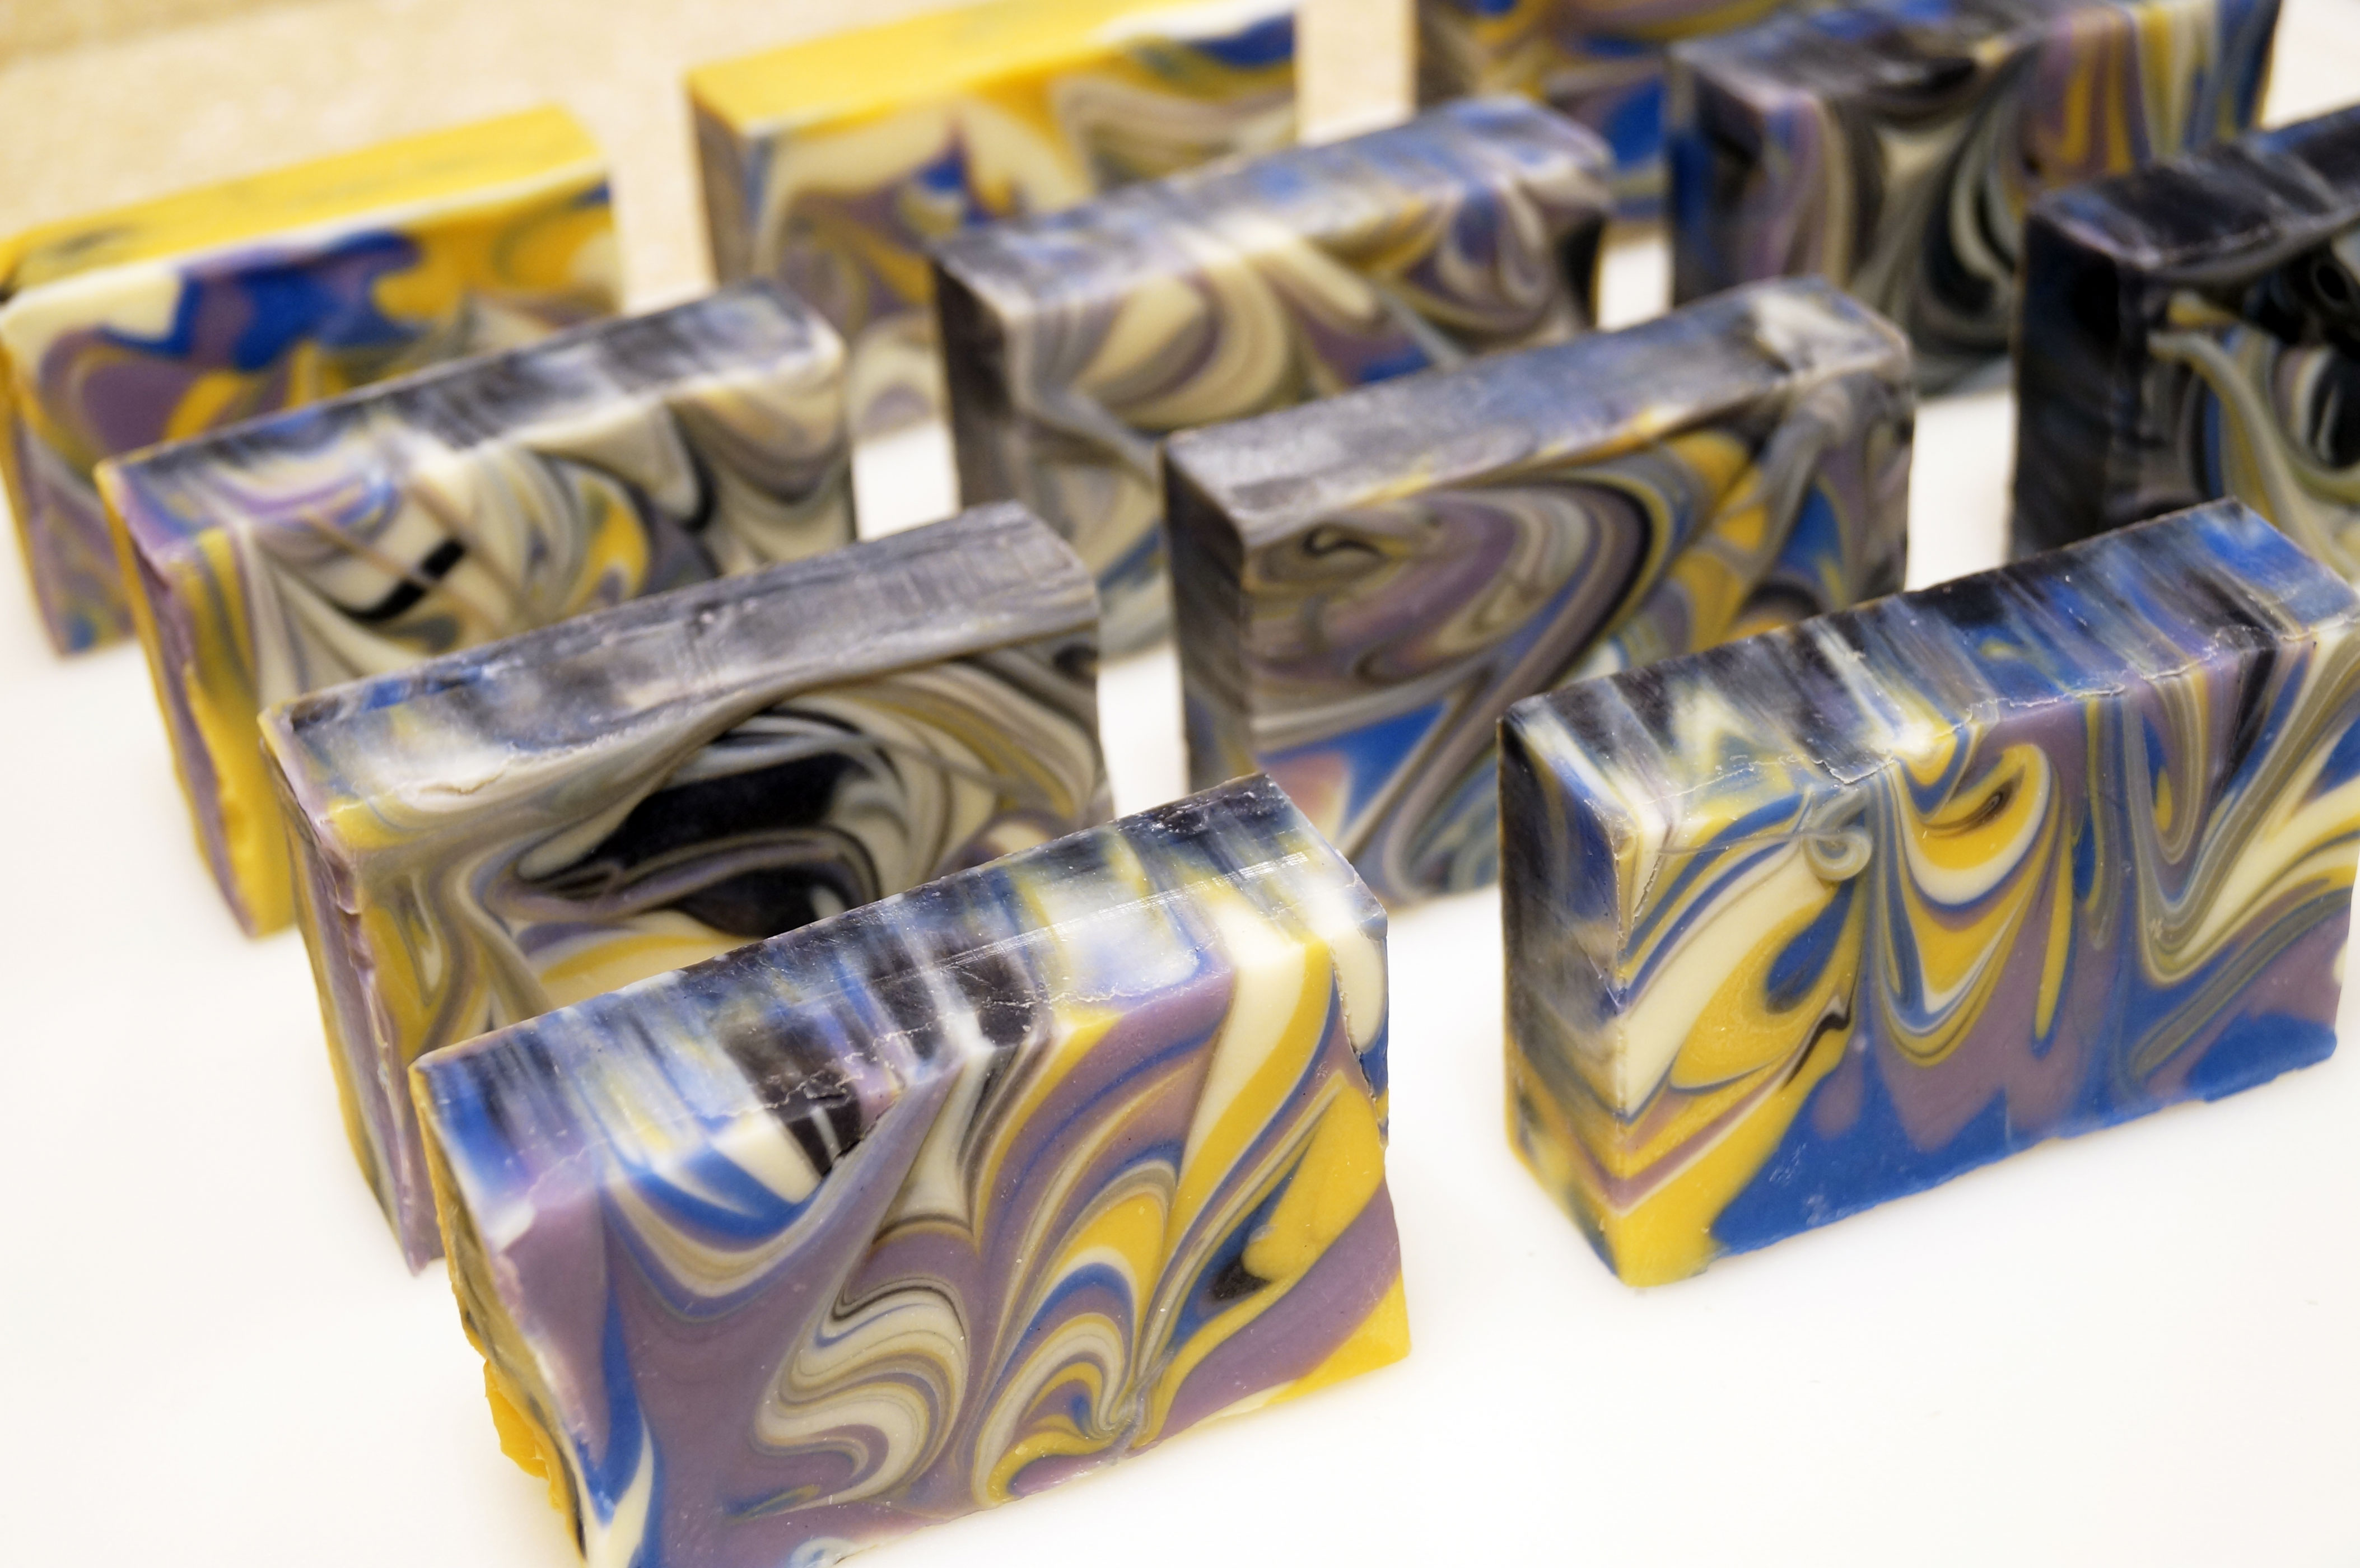
I was a bit nervous to see how the soap looked when I cut the blocks lengthwise. Below is the soap after I made the final cut through the center of the block. Success! We have color!

Taiwan Swirl blocks cut lengthwise.  Success with some colored swirls!

Taiwan Swirl blocks cut lengthwise. Success with some colored swirls!

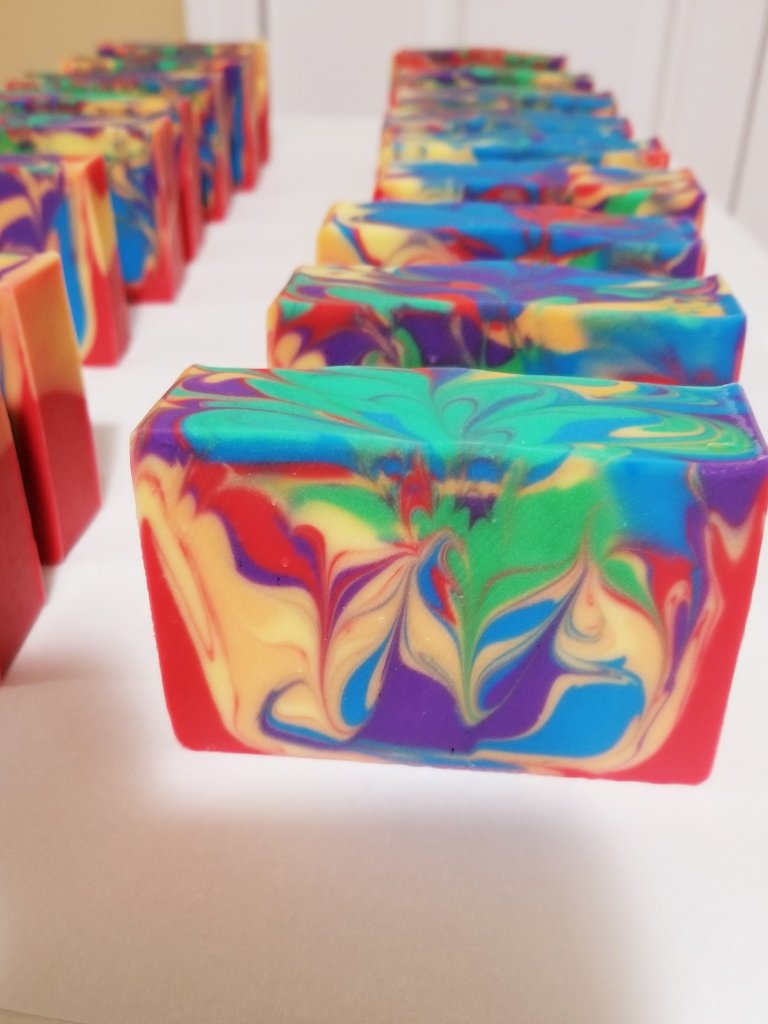
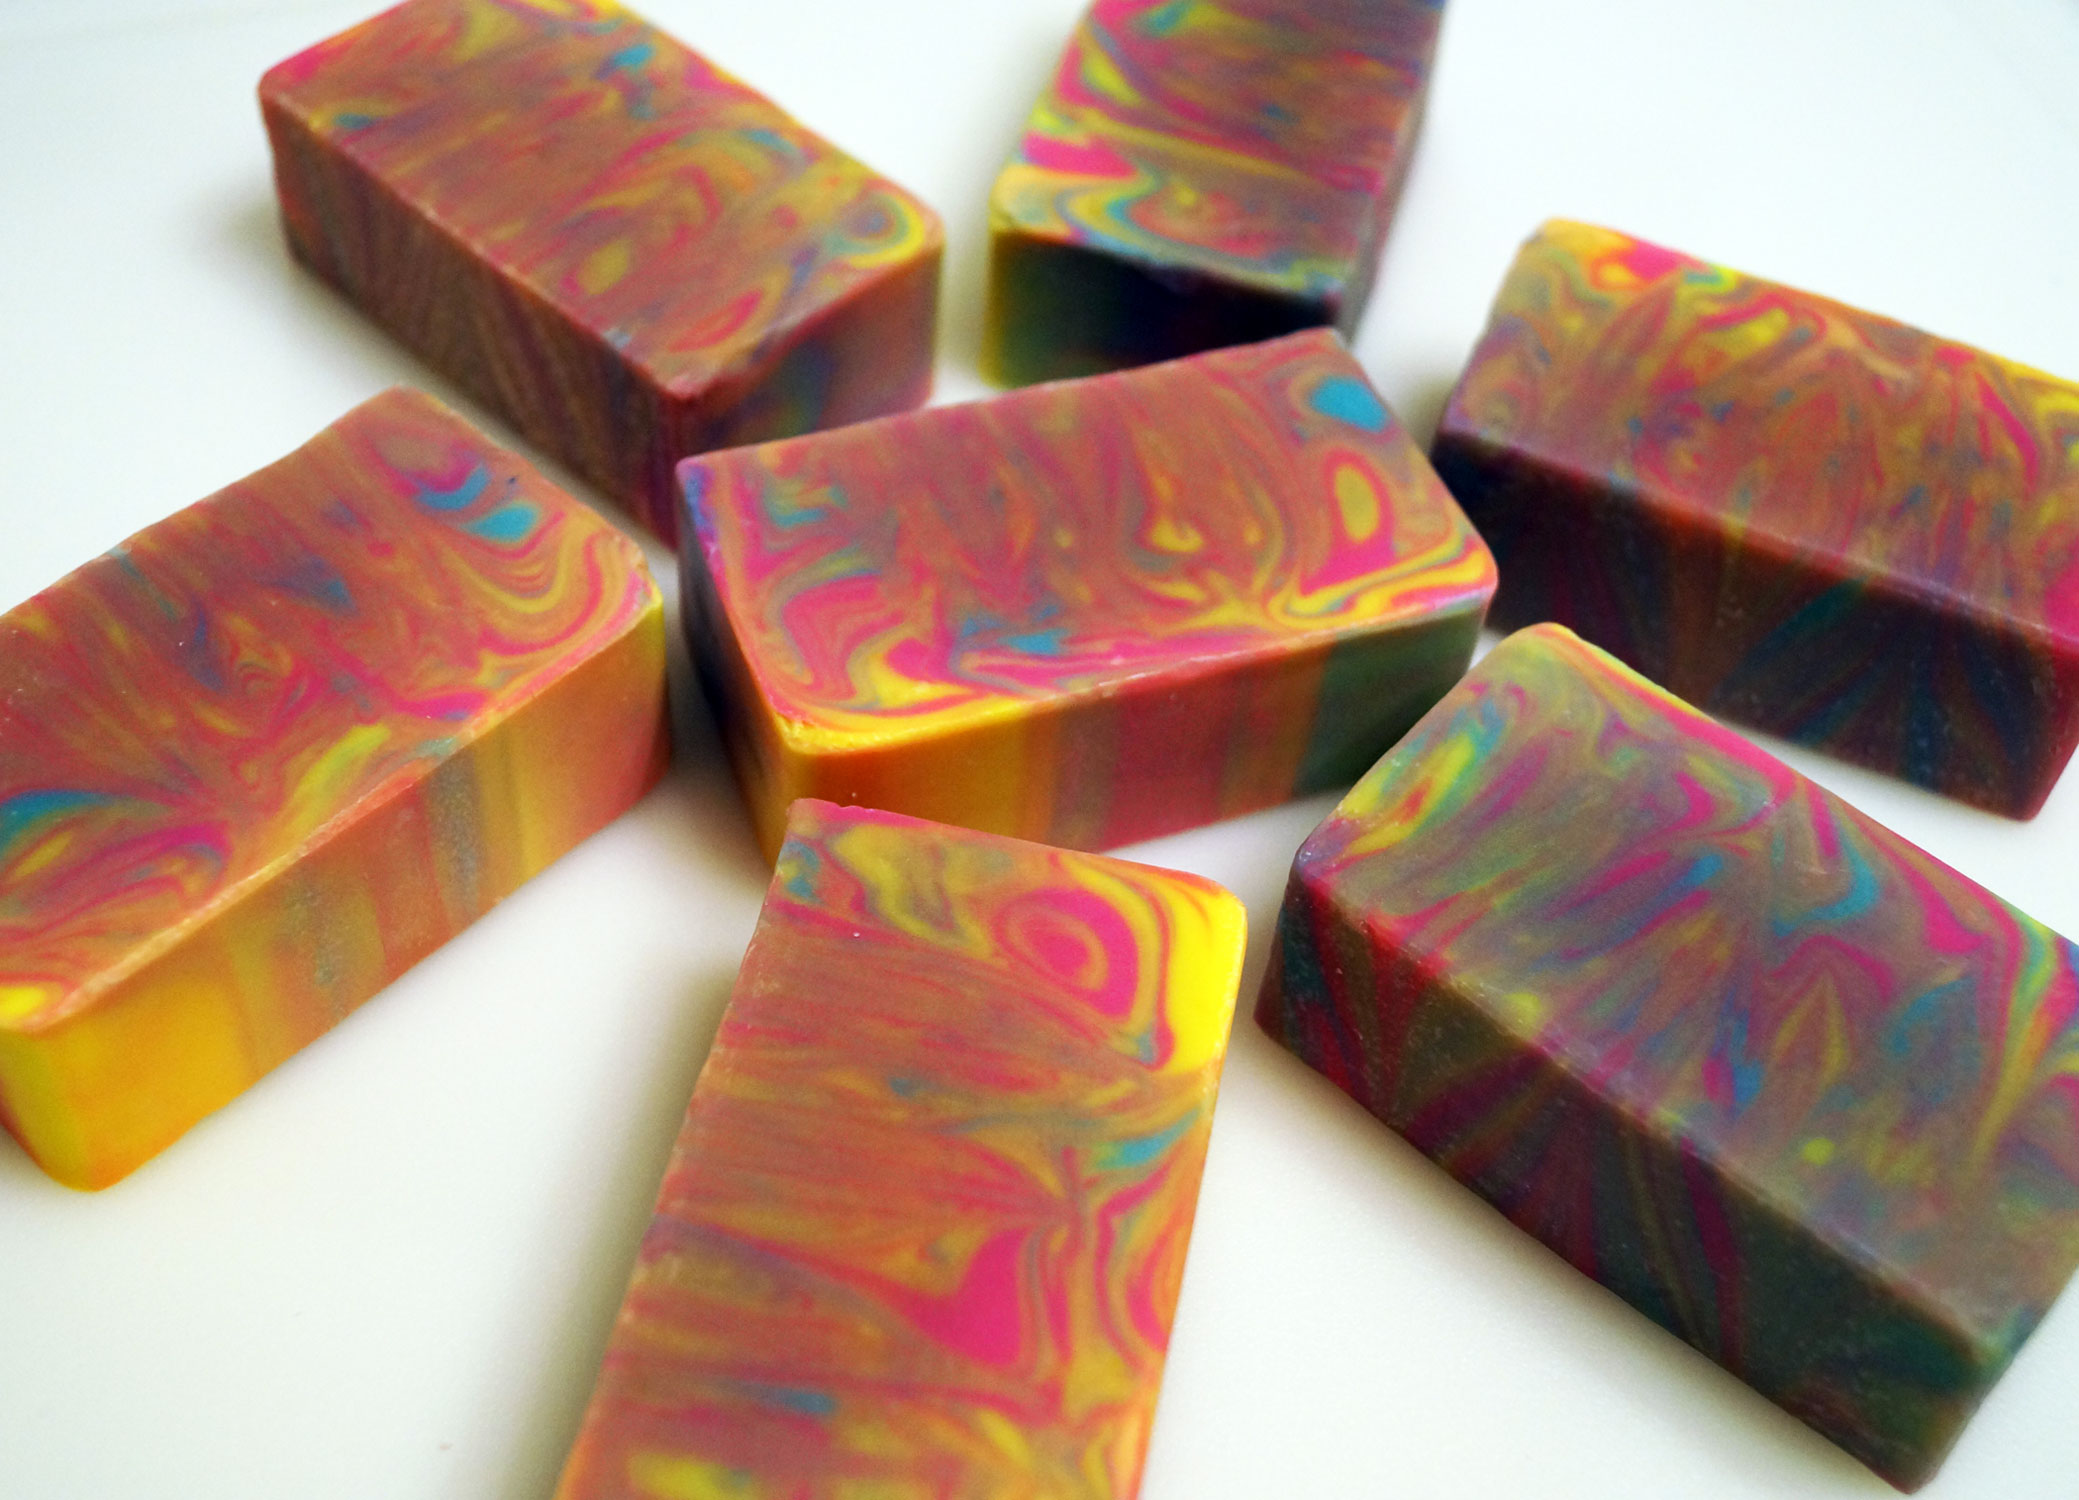
Here is a beauty shot of the design on top of the soap.

Taiwan Swirl Soap Top

Final Product – Taiwan Swirl Soap Top

I also noticed that this formula produces more soda ash than other batches I have made in the past. Soda ash while not harmful is cosmetically ugly. I first tried steaming the soda ash off with an iron with little success. I was able to successfully scrub the soda ash off the final product with a wet nylon. I typically like to pour at medium trace and use a lot of solid butters that help keep the soap batch more viscous. This seems to help reduce or even eliminate soda ash for me.

Feeling confident, I wanted to give this another go. I made another batch using the same 80% olive oil/ 20% coconut oil formula but discounted the water to produce a 30% lye solution. I have had success in the past with using 30 – 34% lye solution and like how it helps shorten the cure time. I was hoping that it would also help reduce the soda ash.

For this second Taiwan Swirl batch, I used Ylang Ylang essential oil for the fragrance and Celini red mica and bubble gum pink pigment for the colorants. When the batch was emulsified but just before thin trace, I added the Ylang Ylang EO.

It was at this point that I realized that I should have followed Amy’s admonition “If you are unsure how your fragrance will behave in your soap, don’t use it!!”. I knew Ylang Ylang was a floral scent but I shrugged it off since the first batch went so well.

The soap batch thickened instantly after adding the Ylang Ylang EO.  I knew I had to move FAST! I quickly poured off a cup of soap for each of the colorants and whisked in the mica and bubble gum pink pigment for a few seconds. Then I hastily poured the soap into the mold. I ended up alternating layers of the colored soap with the base uncolored soap. I then poured colored “stripes” on the top of the soap. The soap had the consistency of toothpaste at this point. I did do a swirl pattern on the top with a chopstick but this was no “Taiwan Swirl”.

Taiwan Swirl - second trial

Second Taiwan Swirl trial – appearance after initially pouring and swirling soap

This is how the soap looked after removing it from the mold 48 hours later. Although it is not really a Taiwan Swirl design, it is still good-looking and a keeper. No soda ash too! 🙂

Second trial - out of soap mold

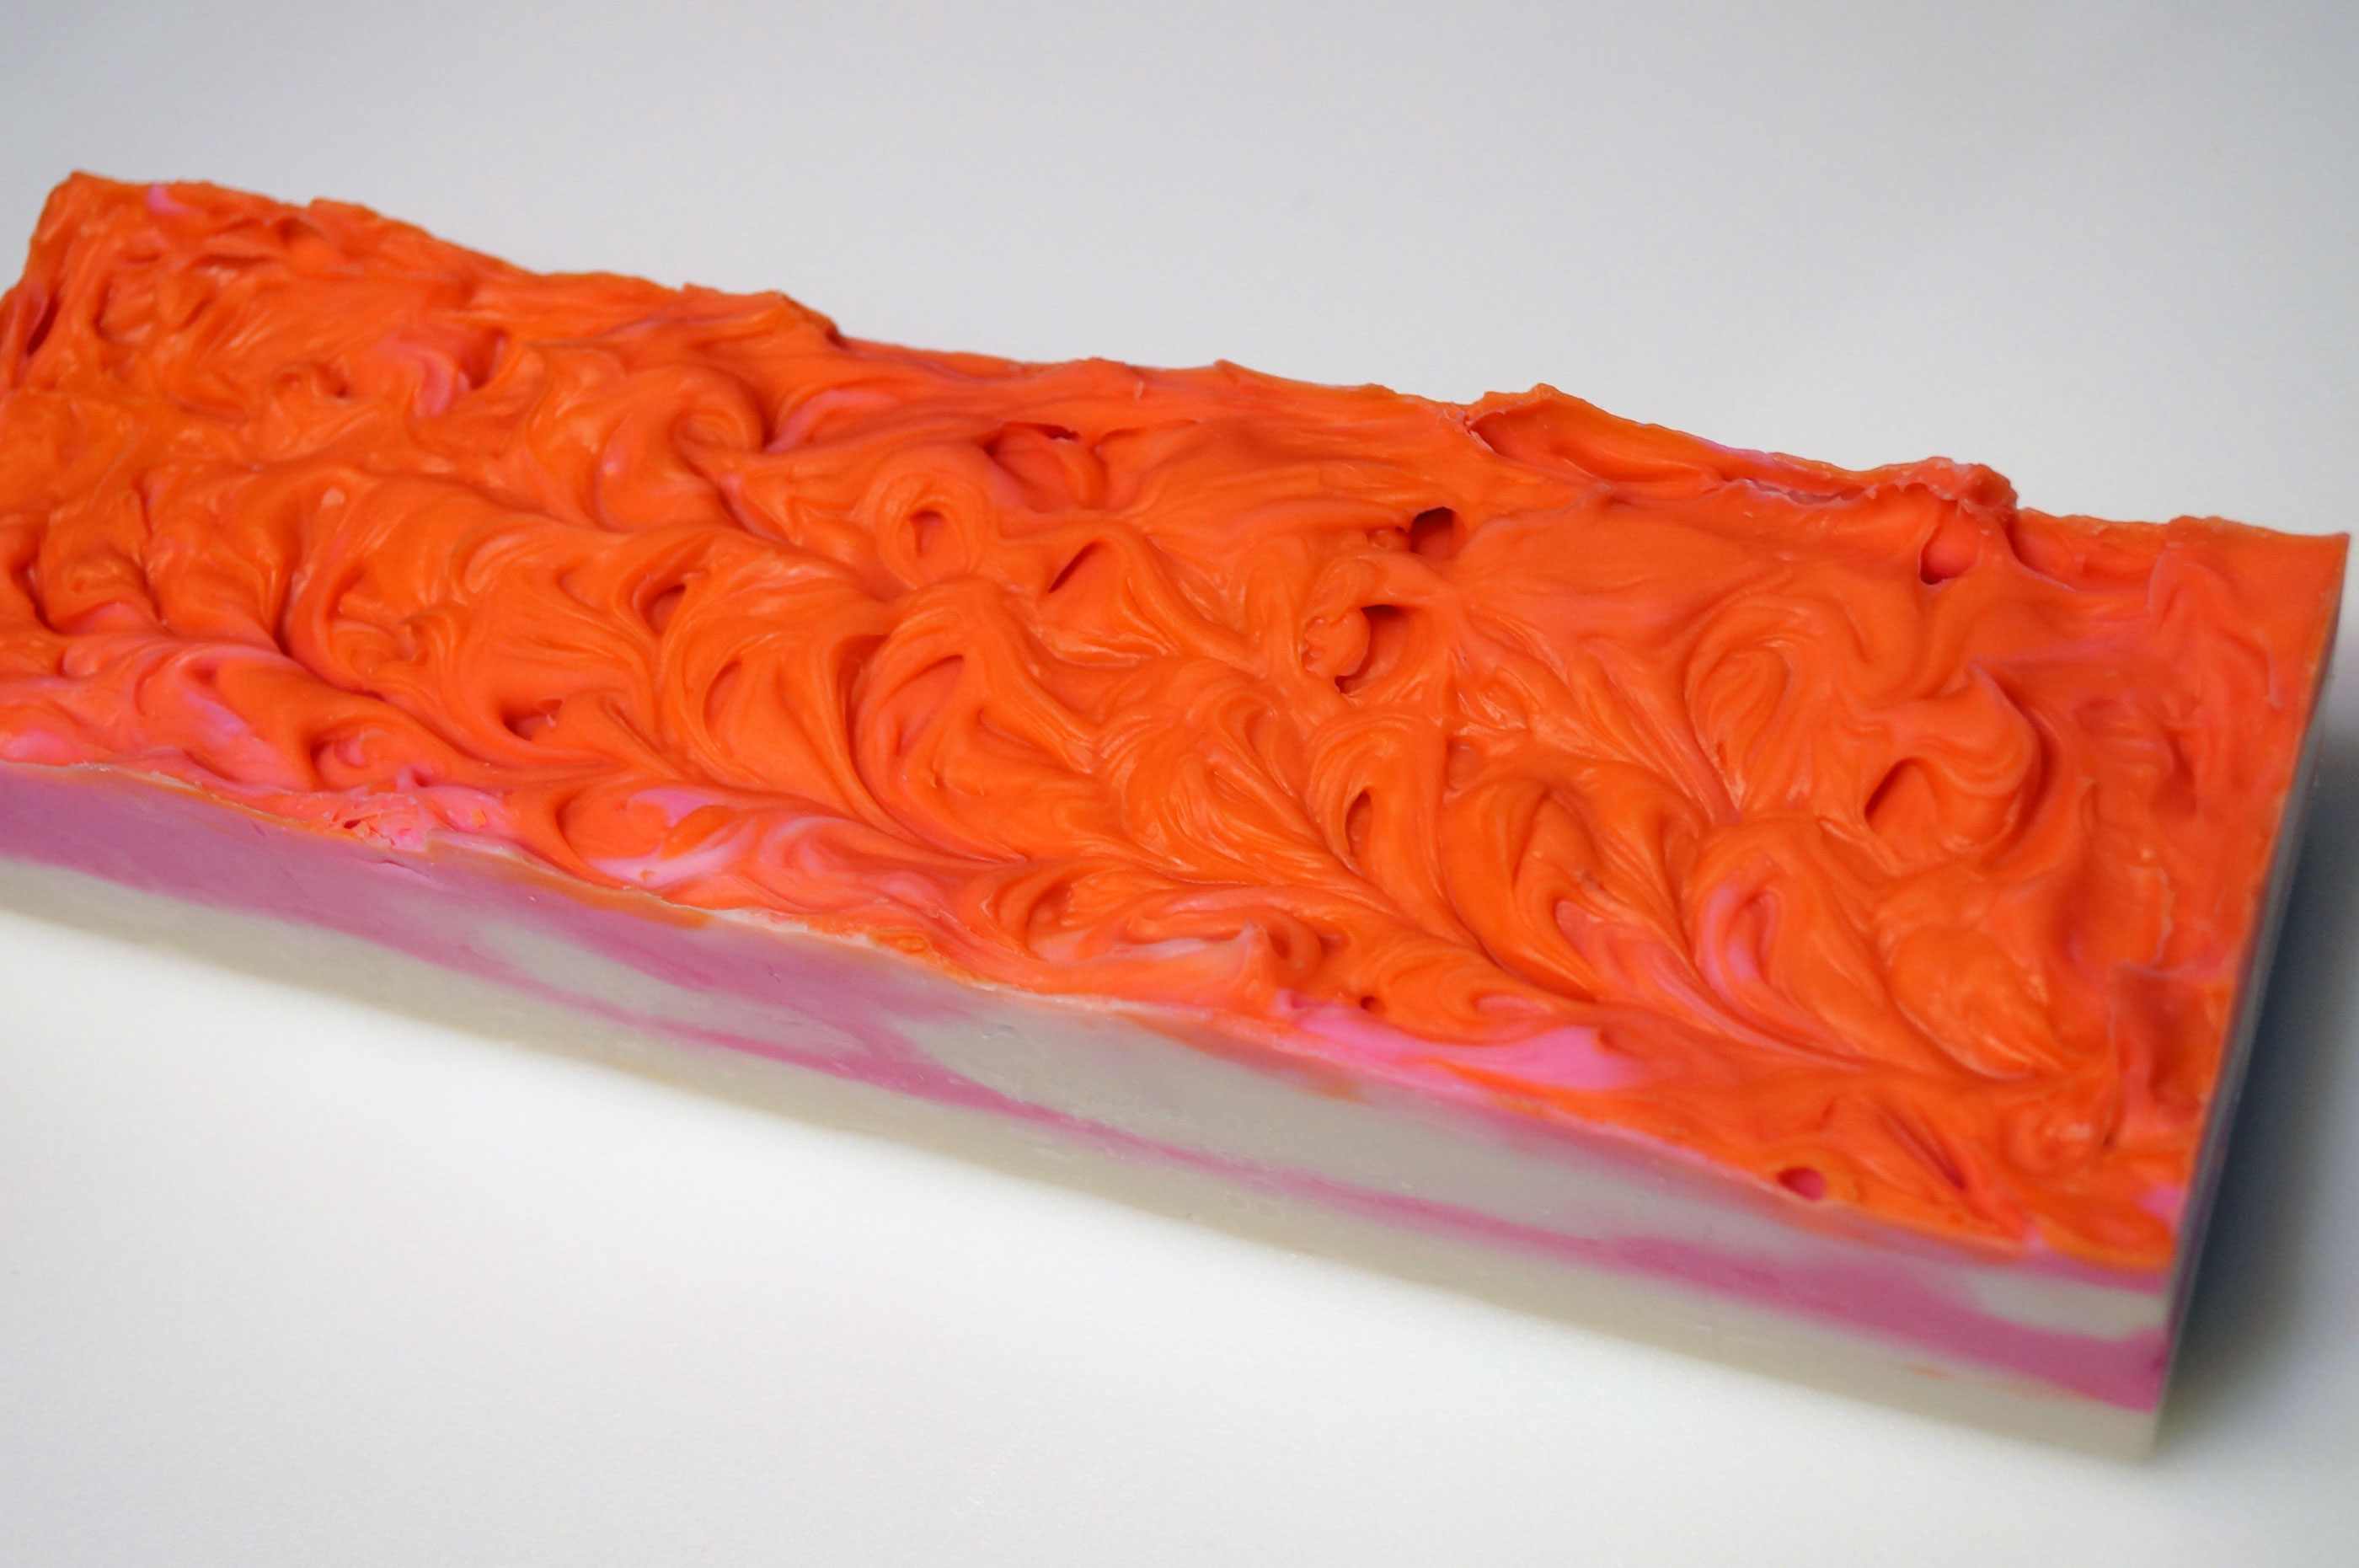
Second trial – out of soap mold

I want to try this technique again with a slab mold. It is more challenging to use a log mold with the Taiwan Swirl and I don’t want to bother with pouring at such a thin soap emulsion just to make sure that the color seeps through the soap.

Overall, I love this technique and want to experiment with it a bit more. I am also looking forward to seeing the other challenge participant’s soaps!

Soap Challenge – Cirque Du Soleil Inspired Column Pour Soap

I am always interested in trying new techniques so after seeing a few blog posts about Amy’s Great Cakes Soapworks Soap Challenge, I decided to join this month’s challenge. This month, we had to use the column pour technique in a soap design.

This was my first time trying this technique and I may have been a bit over-ambitious for my first attempt.

Two weeks ago, I was in Las Vegas walking through the Bellagio and I saw this display for the Cirque Du Soleil “O” show.

Cirque-Du-Soleil

“Wow! These are really cool colors to use in a soap design.” I thought.

I also spotted this poster of the Cirque Du Soleil “O” Zebra characters in a Bellagio gift shop. I became even more excited and wanted to try to mirror the stripes of the Zebras in a soap design.

Cirque-Du-Soleil: The zebras

Cirque-Du-Soleil O: The Zebras

I was so inspired by the idea that I bought a new slab mold just for the trial. I love this slab mold because all the side panels can be disassembled for easy soap removal.

For the columns, I used these wooden beads shaped like a star and block. I taped sections together and wrapped them in plastic wrap.

Blocks and Slab Mold for Column Pour Challenge

Blocks and Slab Mold for Column Pour Challenge

Big plans, big dreams………. foiled by heavy trace in 3 out of the 5 colors. 😉

For the soap base, I used slow-moving olive, almond and canola oils along with palm, coconut and palm kernel oils. For the design, I used 5 different colors: yellow oxide, ultramarine blue, ultramarine violet, black oxide and white (titanium dioxide). After mixing in the colorants, I added citrus-smelling “Energy” fragrance oil to the soap mixtures.

The white and violet mixtures were at light trace and flowed easily on the blocks. However, the black, yellow and blue soap mixtures were very viscous and hard to pour on the blocks. I just managed to get all the soap poured in the mold before it became very thick and gloppy.

Mr. Ecoviolet was my photographer for the occasion and after seeing my dismay wanted to help. “OK” I told him. “Take these chopsticks and just make radial lines from where I took out the blocks”.

He nodded in understanding and proceeded to make huge random zigzags and swirls with the chopsticks. Argh!!! I probably should have been more specific about what I meant by “radial lines”.

I did go back and draw lines radiating from where the blocks where in the soap and this is what we ended up with. It doesn’t look like a typical column pour soap but I still think it looks pretty good.

Soap after initial pour

Soap after pour

The colors became more vibrant as the soap went through gel stage. Here is the soap after 4 hours of cure time.

Column pour soap after 4 hours

Column pour soap after 4 hours

After 24 hours, the soap was still very soft. It was very helpful to have a mold with removable panels. Lining the mold with freezer paper also helped with soap removal. I had to be extra careful because it was easy to dent the soap.

Column pour soap out of mold after 24 hours

Column pour soap out of mold after 24 hours

All lined up and ready for cure!

Column pour soap ready for curing rack!

Column pour soap ready for curing rack!

Not bad-looking for my first column pour. I want to try the column pour technique again and execute my original vision. I was probably just too slow in getting things mixed, staged and ready to go.

I am still happy with the outcome and the scent is amazing. I also can’t wait to see the other challenge participant soaps out there!

Almond Biscotti Cocoa Soap

Currently on the cure rack is a batch of almond biscotti cocoa soap. I made this CP soap three weeks ago hoping that it will be ready it time for Christmas gifting to family and friends. Usually, I will wait until the last-minute to shop for presents but soapmaking forces you to plan 4 – 6 weeks ahead of time.

I also had a chance to break in my shiny new silicone soap mold (in the background).

Almond Biscotti Cocoa Soap Log

Almond Biscotti Cocoa Soap Log

The soap uses blend of coconut oil, olive oil and shea butter. This was supposed to be a neutral cream-colored soap but at the last-minute, I threw in a bit of cocoa powder for an interesting contrast.

I added a medium amount of fragrance per the supplier’s recommendations. The aroma was quite strong initially but now has mellowed to a pleasant almond cookie-like scent. I am always tempted to sniff a bar when I walk past the curing shelf.

I expected fragrance to discolor the soap dark tan but was happy that the soap stayed a nice cream color.

Almond Biscotti Cocoa Soap

Almond Biscotti Cocoa Soap

Waiting for CP soap is cure is about exciting as watching water evaporate so to amuse myself, I have tested several soap batches while they cure. I have monitored pH, weight loss, hardness, scent and appearance. I realize not all soap makers do this much testing but as a person with a heavy science/math background, I like experiments and crunching numbers. I’ll discuss in detail my test results in a future post.

In just a couple of weeks, this batch will be ready to use!