I had so much fun with Amy’s soap challenge last month that I wanted to do this month’s challenge. The soap challenge for January is the Taiwan Swirl. For the Taiwan Swirl design, a base of uncolored soap is first poured into a mold. Stripes of color are then poured along the length of mold. The colored stripes are swirled to produce the design. The soap mixture needs to be very thin so that the colored stripes flow through the base soap. After the soap is cut, all the bars should have some sort of design.
I used the same formula suggested in Amy’s demo – 80% olive oil / 20% coconut oil. I also used the full water amount (26% lye solution). For the fragrance, I used lavender essential oil.
For kicks, I wanted to try three colorant stripes. For the colorants, I used Celini red mica, green chrome oxide and a 2:1 mixture of ultramarine violet and ultramarine blue.
This was a very workable formula for this type of design. I poured at thin trace and still had ample time to swirl the colors.
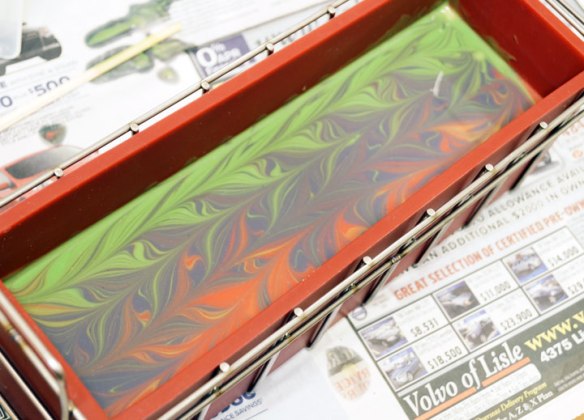
This is what the soap looked like after it was just poured and swirled.
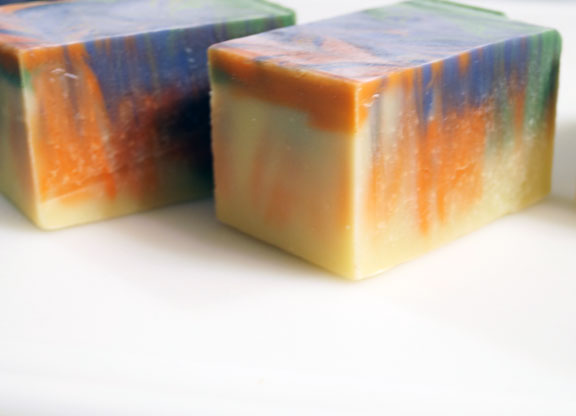
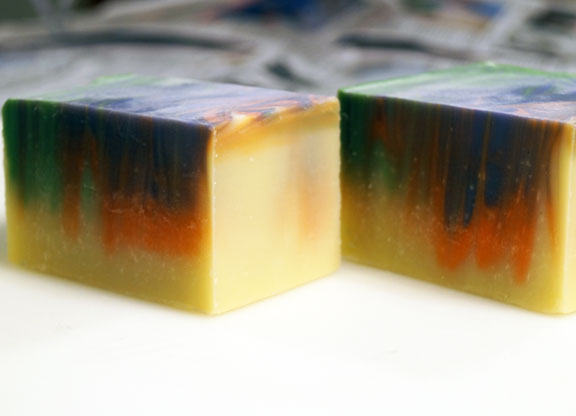
After 24 hours, I removed the soap from the mold. It was so soft that I couldn’t cut it without damaging the soap. I waited another 24 hours to cut the soap to check to see if the colorants made it into the center (see the pictures below).
Curiously, the red mica made it through 3/4 of the soap base but the green and violet colors were not as consistent. For some parts of the soap, the green and the violet made it halfway into the soap base. However, in other parts, the green and violet only made it through 1/3 of the soap base.
I was a bit nervous to see how the soap looked when I cut the blocks lengthwise. Below is the soap after I made the final cut through the center of the block. Success! We have color!
Here is a beauty shot of the design on top of the soap.
I also noticed that this formula produces more soda ash than other batches I have made in the past. Soda ash while not harmful is cosmetically ugly. I first tried steaming the soda ash off with an iron with little success. I was able to successfully scrub the soda ash off the final product with a wet nylon. I typically like to pour at medium trace and use a lot of solid butters that help keep the soap batch more viscous. This seems to help reduce or even eliminate soda ash for me.
Feeling confident, I wanted to give this another go. I made another batch using the same 80% olive oil/ 20% coconut oil formula but discounted the water to produce a 30% lye solution. I have had success in the past with using 30 – 34% lye solution and like how it helps shorten the cure time. I was hoping that it would also help reduce the soda ash.
For this second Taiwan Swirl batch, I used Ylang Ylang essential oil for the fragrance and Celini red mica and bubble gum pink pigment for the colorants. When the batch was emulsified but just before thin trace, I added the Ylang Ylang EO.
It was at this point that I realized that I should have followed Amy’s admonition “If you are unsure how your fragrance will behave in your soap, don’t use it!!”. I knew Ylang Ylang was a floral scent but I shrugged it off since the first batch went so well.
The soap batch thickened instantly after adding the Ylang Ylang EO. I knew I had to move FAST! I quickly poured off a cup of soap for each of the colorants and whisked in the mica and bubble gum pink pigment for a few seconds. Then I hastily poured the soap into the mold. I ended up alternating layers of the colored soap with the base uncolored soap. I then poured colored “stripes” on the top of the soap. The soap had the consistency of toothpaste at this point. I did do a swirl pattern on the top with a chopstick but this was no “Taiwan Swirl”.
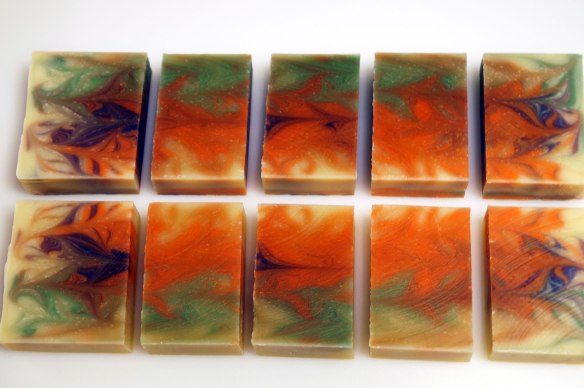
This is how the soap looked after removing it from the mold 48 hours later. Although it is not really a Taiwan Swirl design, it is still good-looking and a keeper. No soda ash too! 🙂
I want to try this technique again with a slab mold. It is more challenging to use a log mold with the Taiwan Swirl and I don’t want to bother with pouring at such a thin soap emulsion just to make sure that the color seeps through the soap.
Overall, I love this technique and want to experiment with it a bit more. I am also looking forward to seeing the other challenge participant’s soaps!


Very pretty. I have never used Cellini Red but I might have to give it a go – it really pops.
Thanks Bonnie! The Cellini red mica is from Brambleberry. It turns a pretty orange-red in CP soap. I also like how it pops!
I had a good chuckle reading about your second batch – because it mirrors my own experience so closely! My mistake was adding some jasmin dilute to my (usually well-behaved) EO blend – I thought “it’s just a few drops – what harm could that cause??!”. Hhhhmmmmm …… Don’t think I’ll do that again in a hurry.
Hi Debbie- how funny that you had that experience too! It is amazing how just a few drops can make THAT much difference!
Your first soap looks beautiful! I’m sure the second one would have looked great had trace not accelerated. I used a slab mold so I didn’t have to worry about the colors reaching the bottom. I am now really loving the slab mold. 🙂
Thanks Silvia! I have to try this swirl again with a slab mold. I noticed that you were able to make this work with a 37% lye concentration. Now I am really curious to keep trying the discounted water formula with this technique again. Using a slab mold will make the process easier-I don’t have to worry about keeping the soap so fluid that the colors can flow into a log mold. Loving your new swirl tries too!
I think the slab mold makes it a lot easier to execute the Taiwan Swirl. A high lye concentration is very doable but the window that it stays fluid is relatively short. I soap at room temperature, and for some reason I feel that oils that have been mixed and allowed to rest for at least half day works better. Good luck on your next try! 🙂
Hi Silvia- Thanks for the tips! Makes me really curious now – I may do more experiments on this. It is probably warmer where you live vs. where I live. I usually soap around 90 – 110F (32-43 C). Are your room temp. soaping conditions significantly lower than this? I was around 110F for the Taiwan Swirl batches and the process window was wide for the full water batch but significantly shorter for the higher % lye conc. I may drop the temps a bit for this next batch -I shot for a higher temp. initially based on Amy suggestions.
I usually soap around 80 – 90 F. I am curious to know too what your findings are. 🙂
Thanks Silvia! It is currently 18F outside here so my room temp. conditions are a bit lower. 🙂
I am going to do an experiment with a range of temps- 80F seems like a good low starting point for me. Stay tuned…..
I love that color combination! And oh, yes, ylang ylang… it’s a sneaky one to work with! But in the end it’s still a lovely soap.
Thanks Ruth! I love how all your swirl soaps came out. You are right-so many variables that have to work together to get this to work (mixing, fragrance, color, formula). That’s what I love about soapmaking!
First of all, I really appreciate your findings with the soda ash. I, too, had some issues with it using the 80% olive, 20% coconut recipe. Of course the point of using the recipe is to keep the batter fluid, and having more water in the lye solution also helps with that. The question is – is it worth the trade-off to be able to make a beautiful design? 🙂
Secondly – your first soap just looks fantastic! I love how the three colors swirl together without overmixing. 🙂
Thanks Amy! Interesting too about the soda ash. My second batch is a week old and still absolutely no soda ash. I am curious if the discounted 80/20 olive/coco formula can still work with another fragrance. Or else I play with the oil types and %? More experiments! 🙂
Thanks also for setting up these challenges! So fun!
Love your flowing swirls in the first batch.
Thanks Cris! I had fun with this.
Beautiful swirls! Love how fine they are and the colours are great! I wish I’d followed Amy’s advice and gone with the 80/20 OO/CO too but I fancied more bubbles, included 10% Castor oil and ended up with a quicker trace than I would have liked. Ho hum 😀 I love the colour and texture of the top of your second one too!
Thanks Vicki! I was thinking about adding castor too but decided to try it with Amy’s suggestion first. I love the pastel colors of your swirl soap and the castor oil will make it quite nice & bubbly.
Love your colours. I too have never used Cellini red but am going to try it now! Shame about your second batch too, but the colours are gorgeous.
Thanks Gail! The Celini red is a red that turns a bright orange in CP soap. Gorgeous!